What you'll need:
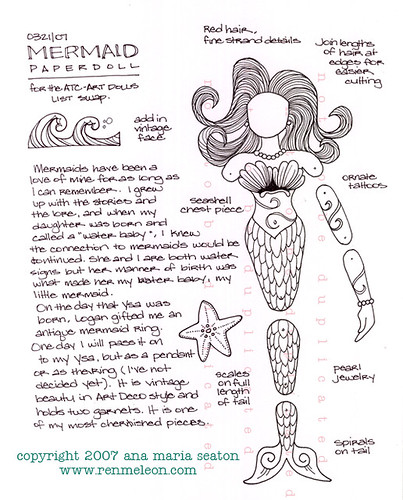
Printed paper mermaid doll pattern.
Rusty old thin sheet of metal
New sheet of metal (flashing)
Tin snips or Fiskars heavy duty craft scissors
Leather gloves
Metal file
Hammer and small nail
Scrapbooking brads
E6000 (or other adhesive that will work on metal)
18 Ga. craft wire (I used copper)
small pearl beads
needle and thread
What to do:
1. BODY: Cut out paper doll pieces from the printed paper and trace onto the sheet metal.
 2. Wearing the leather gloves, cut out the metal doll pieces using tin snips. I found that these were good to start the cutting or to cut out the general shape, but I finished up with the Fiskars heavy duty scissors. Because I was cutting small pieces and tight corners, the Fiskars performed better. File all edges and make sure their are no sharp pointy areas that could easily cut.
 3. Arrange pieces so that you have a general idea of what body part is going to be above/below another when you layer them for hinging. I started out with both upper arms in front of the torso, but moved the left arm to be behind. With the hammer and nail, hammer all the hing holes. I tried to keep the nail hole centered on each area (a few slipped) and I hammered the two layered parts at the same time. For example, if the upper left arm is going to be behind the left torso shoulder, then I nailed through the torso and upper arm together. Make sense?? I think I'll leave it at that. Carrying on...
 4. Once all the holes have been hammered in, insert a small scrapbooking brad into each hole.
 YAY! You have a basic metal mermaid doll!! Sitting...
 Swimming...
 Dancing...
 haha...that was fun...Now for the hair, I was inspired by this website here. Go check them out...Are those not the FUNNEST mermaid wall art pieces!! I REALLY want one, but where would I put it? That's my rule for house decor, must have a place in mind for before it can be purchased.
5. HAIR: I wanted her to have the shiny wet hair look...she's a mermaid after all, her hair will be wet. So I used some new flashing that we had in our garage. I first traced one side of her head to create a matching curve, then from the top and bottom of that curve I cut straight across to basically create a rectangle, except the one side was curved. Remember, I made this up as I went so I hope it makes sense. The longer the rectangle, the longer the hair will be. I think mine was about 6 inches. With a pencil, I trace the rest of the shape of her head to give myself a reference point of where to stop cutting. I then cut thin strip, anywhere from an 1/8" to 1/4" wide, from the straight end of the rectangle to the reference point just drawn.
 6. I then used the pencil to start curling the hair. I laid the pencil on the top of the metal, held one end to it and rolled it towards the head so the curls curled inward towards the face. Just curl tightly as possible without tearing the metal. I realized my 1/4" wide strips were a little too wide, so I went back and cut all my strips into two. See the difference?
 More curling...I thought the pencil was a bit big, so I went to a screwdriver that was slightly smaller.
 LAST curl...whew!
 7. After all that curling, I placed her hair piece back behind her head and started stretching them all out into a desirable shape. You can see the three on the bottom are stretched. I wanted her to have a flowing watery look, so I stretched them out the the right.
 I figured she needed bangs, so I trimmed a few on top. It was also to help cover up the top forehead.
 More pulling and placing of curls...
 Once you're done primping, follow the instructions on the E6000 for gluing, allow to dry for a day or two and your done! YAY, you have a metal mermaid doll with hair!
 8. EMBELLISHING: This part stumped me...the challenge was to use paper...I tried MANY ways...I just couldn't do it. So I pulled out more metal; metal wire, metal buttons, metal beads, metal rings...and of course pearls. A mermaid has got to have pearls. The pic below shows her with two metal buttons for a brazierre. Of course that was not was she ended up with.
 I beaded a pearl necklace and pearl bracelet onto her. The bracelet was with thread, the necklace was on a small gauged wire so that I could shape it around her neck. Using the 18 Ga. wire, I spiral wired a different brazierre which looped behind her neck and back down to the other side, also being a spiral shape. Surprisingly I did not take any pics of my mermaid by herself before sending her off to her new home. This was the best I had, a cropped photo.
 I hope this all made sense! One thing I thought of but did not have the tools to follow through with it was to texture her tail fin with scales. My dad had a metal alphabet set for stamping into metals, we couldn't find it. I wanted to use the parenthesis symbol to create tons of crescent shapes all the way down her tail like they were scales. This would have created a fun texture, I think, but I guess we'll never know.
Now go...make a metal mermaid (or fairy) and enjoy!


 This last one is my most recent addition...welcome to our home pretty mermaid!! You are surrounded by many friends!


 Baby shoes made from


