Showing posts with label crafts. Show all posts

Monday, January 2, 2012

New Puppets in the Works

Well, my first month of puppets for adoption was quite a success in my eyes! A dozen may not seem very impressive, but for a first time shop, I'm gonna say it is. Especially since it was December which is typically my most chaotic month of the year mentally AND I watch a baby 5 days a week for 40+ hours ON TOP OF raising two of my own. All-in-all...a success!
Now that the New Year has been around for 15 days, I started some new puppet color combinations. Above we have blue fur with red head/arms and striped lining as wells as white fur with blue fur head BUT...satin arms! I'm gonna make her (yes a her) a little fancy cuz she's wearing satin gloves to match her fur. I think I'm gonna give her a pearl necklace to go with her Hawaiian print lining fab.
This orange fur with yellow head/arms turned into this fellow below...His name is Jukali short for jua kali or fierce sun.

In the next day or two I should have these socks turned into new sock puppets. They need felt in their mouth, eyes and hair. Then they will each need to go through their own personal photo shoot and interview before being listed in the Etsy shop for sale. And when I say interview, I only ask them what their name is.


I also created a new listing for custom Chura Puppets. My production is not exactly up to speed, you know, with two kids, babysitting a baby and maintaining a house, I'm not exactly sure what my "speed" should be. I'm still learning that part of this new business. Should my goal be six new Chura Puppets a week? Is that pushing it? Or should I aim for just one or two? Today I listed two making my average one a week for the year. (haha...there's only been two weeks in this year so far.) I don't see that as good. We shall see....


Next up...my creative story process and how I came up with "the other end of the rainbow."

Saturday, July 30, 2011

Puppet Profit!!

Puppets, puppets EVERYWHERE!! One day back in June, my son and I had a spur of the moment idea...SOCK PUPPETS!! Toddler was playing with a sock on his hand, 4 yr. old decided he needed one too...VOILA! Craft idea!


We were at grandma's house who happened to have a HUGE bag of sock singles. We dug out about 2 dozen socks, dug out her yarn and felt stash, cut up her caffeine free Diet Coke boxes and searched all over for the hot glue sticks. Then made these fun Fairy Friends!!

SO CUTE!! Both boys got to keep one, then we sold the rest at the Ye Merry Greenwood Faire we went to also with grandma (who had a booth of fairies!) We didn't have to buy ANY supplies!


If you want to make one for your child...check out this tutorial by DownWithClutter.


ENJOY!!

Tuesday, November 9, 2010

Where have I been??

Well...let me tell you...for the month of October I SUPER over-committed myself. As a mother of two...it's pretty stressful. It all started with Halloween costumes. I wanted to make both boys and my college roommate asked me to make hers. THEN it was the countdown to our churches fall bazaar where I signed myself up to donate craft items, desserts in a jar gifts and baked goods. On top of all that was my monthly Year Of Enchantment ornament swap, which was sent out a week late, mostly because of poor time management for the entire month on my part. Well, ALL of these things had to be completely roughly in the same THREE DAY WINDOW!! That's where it got stressful...time was running out. The boys got sick on top of all that.

Other than that brief explanation, here's what I have to show for the month of October:

My swap package for the Year of Enchantment. October's ornament theme was owls. I used Moonstitches tutowlrial. They were so fun to make and SO CUTE!! Below is a pic of the package I received.
In fact, they were so cute and so fun that I decided to make a whole nest of them for the church bazaar. Once again, my camera wanted to fail. Picture taking has been so discouraging ever since it's "accident" I talked about here.
Well, other than all the owls, I made two batches of pumpkin spice cupcakes, two pans of cookie type bars and a dozen jarred "desserts in a jar." They are quart jars layered with dried ingredients then a recipe tag attached on how to make them. I chose the M&M bar and the Dreamsicle bar which was a HUGE HIT!! It's made with Tang...that's what makes it so dreamy I guess. Oh, and our Halloween costumes...
Toddler wanted to be a knight because it had a sword. Look at all his armor!! Thank you dollar store!! Together we decided that baby could be a dragon, and toddler (the knight) could save the princess (that would be me, in a stinky, vintage velvet dress from my moms costume closet) from the dragon. Like the ferocious dragon in the pic?? He was pretty ferocious until we started walking in the stroller. But if I didn't make my dress and ferocious dragon was toddlers costume last year, why was I so stressed about sewing the knight costume?? Oh yeah...because I also had to sew college roommates costume, which was this...to a T. :/ Fur IS NOT fun to work with.

Tuesday, August 31, 2010

August Y.o.E. Ornament Update

Right before I left town last week, I sent my package off to my swap partner, Little Messy Missy in Utah. While I was away, I received hers and got to open it yesterday! What a neat package it turned out to be...
Along with the orni, there was a skein of red eyelash yarn, a pair of knitting needles that she made with an octopus pic on the ball end, an octo-chic bookmark, an octo sun catcher and THREE Utah chocolate truffles. YUM! Just LOOK at this octo ornie....it's knitting! And all the different pics, beads and sand are layered in what I think is clear resin (or something like that). I just GOTTA get me some of this stuff and play with it. It's such a creative ornament!
Thank you Missy for the goodies AND inspiring me to try something new! Below is a pic of what I sent to her...
My two ornies, an octo magnet, a slice of pretty rock, two power bars (she's a runner) and a bag of some of my Idaho garnet gravel that my mom brought me. In her blog she mentioned that she was a rockhound. Well, that kinda stuck in my head and I ran with it. But Missy loved it, so it all worked out great!
Once again I was inspired by this Etsy item to create my octopus ornament. I didn't have a laser cutter and a sheet of acrylic to make such a feller...so I attempted shrinky dink shrink art paper first with black sharpie (left), then with black acrylic paint before shrinking (middle) then with black acrylic paint after shrinking (right), then I was frustrated and bought the colored shrink stuff (top). Yeah, the best solution to getting a black octopus is to paint him black after he shrinks. Then I gave him a clear coat to seal it.

The challenge this month was to make tentacles...so...I found a tentacle pic online here and again played with the shrink art paper to get the right size tentacle to glue rhinestones to as the suckers.
I think both turned out all right...more color would have been nice, but I think I got stuck on the whole black octo idea. Oh well...
Stay tuned for more stories of crafty fun, our travels and some new friends!

Wednesday, July 21, 2010

Gnomies

Having been so busy, I realized I missed the last two I Spy Friday's...well, the last two I was out of town...I think...anyways...I'll have one for ya this Friday.

I managed to post about my Year of Enchantment gnome ornament on the SwapperSpot blog but not here...I made five or six of these little guys (after some internet inspiration) only to have ALL but TWO BREAK! Darn air dry clay....maybe I didn't use enough water to attach the pieces. I don't know... Here's how the only two that made it finished up with a bit of acrylic paint and a glaze that said it would take up to ten days to dry! Well, I only waited two until I mailed them. :) Here's the rest of what I sent......the two gnomes with three gummy army men, several teas, many perty pieces of paper (my swap partner is participating in a dress a month crafty-along here) and a yard of red and white check fabric for her Tumbleweed (here). In return, here's what I got...
VERY SIMILAR GNOMES!! There's a funny story behind these guys. I got her package before I even sent her my package. I was a few days behind because of playing with clay AND painting AND glazing...so there was some unexpected dry time that took quite a bit of time in between each task....well, I was approaching day two out of the ten days of drying for the glazing and decided that I was going to mail them anyways because they felt dry. Once I came back from the post office, I ripped open my package to find all those goodies and three gnomes and a gnome home with a baby in it and I cracked up laughing!! I title my other post Great Minds Think Alike cuz we were inspired (I'm pretty sure) by the exact same internet source!! Okay, okay....should I reveal our secret source?? FIRST...I have to say that I AM NOT reproducing this Etsy sellers creations for profit. I created the gnomes for a crafty swap giveaway. One time, that's all. IF YOU would like a cute little gnome of your own, and they're custom made, go visit HumbleBea's Etsy shop and you can find some of these adorable gnomes for yourself.

Thursday, February 18, 2010

Leavenworth, Washington

Well, we're off to another craft retreat weekend with my mom, aunt and grandma (and of course my two boys). This is what we'll see tomorrow and all weekend, at least when we look outside our room. I wonder what I'll create this time?? Here is what I created last time.

I'll also me mailing my Year of Enchantment package from Leavenworth...after I stuff some Leavenworth goodness into it! Get ready Robin, my fairy is flying to you!

Have a great weekend!

Tuesday, February 16, 2010

Happy (belated) Valentines Day!


I thought I would share a cute little crafty tutorial for some sweet magnets to make with your little ones. My three year old and I made a set for each of the grandparents.

Supplies needed:
-bottle caps
-acrylic paint
-varnish for acrylic paint (optional)
-paint brushes
-various felt colors
-printed pictures
-sheet magnet or old refrigerator magnets
-craft glue
-scissors

FIRST: Clean and dry the bottle caps of any stickiness. Paint inside of bottle cap with acrylic paint, allow to dry in between coatings. (I applied two coats to hide the brush strokes.) Final layer could be the varnish, it just makes it shiny, but is not required.
THEN: Cut out desired pictures into a 1 inch diameter circle (or a tad smaller) and cut out heart shapes from felt. Cut 1/2" square pieces of the magnet. (I bought sheet magnets only to realize that I could have used the old calender sheet magnet that was on the fridge.)
AND THEN: Glue magnet to back side of bottle cap, or if sheet magnet, peel paper and stick.
FINALLY: Glue pictures or felt heart shapes to inside of bottle cap that was painted. Allow to dry, then wrap them up and give them to the ones you love!

Wednesday, January 27, 2010

Destash-Along & Blog Update

Well, my first project has been completed for the Destash-Along I'm participating in. Until my Year of Enchantment swap partner, Natalie, receives her ornaments, I can't really show them, but I DID use some small bits of my stash for this project. In fact, all of it was from my stash except for the string I used to hang them...I was really picky about the thickness and color, so I had to go by some, so really, 95% of the materials used in making my ornament is from my stash!! Yeay!!

I just learned how to add the percentage bars into my blog t0 show the progress of my crafts I'm working on...Crafting with Cat Hair, the Destash-Along idea generator/hostess blogged about it and shared her info. You can learn about it here and add them on your own blog if you're a crafty, crafter like myself. :) Now you all can see what my current projects are, which are all knitting projects that I kinda have deadlines for. If I'm working on something without a deadline, I don't think I'll put it up. Monthly I'll be changing my progress for each month's YOE ornament. So, this month's is at 100% since it's already been sent in the mail.

I also figured out how to show the number of destash-along projects I've completed. It doesn't show each project, but....well, I guess you can search the post labels to find out what they were. Maybe I'll number them...I don't know...it's early enough in the year that I haven't figured out that detail yet.

Friday, December 18, 2009

Crazy Holidays!

I see that I haven't posted for over a month...which goes to show that I've been crazy busy with this holiday season. It all started in November with the Enchanted Forest Ornament Swap AND a mystery knit-a-long on Ravelry with Woolly Wormhead. It turns out I chose to knit Everglade which she now sells on her website. It is SUPER FUN to knit up, but I still need to finish it. That's one of my holiday knitting projects. However, I created a second hedgehog for someone...it just got mailed today so I won't say who. :) I've started testing another knitting pattern for the Ravelry group for test knitters. Turns out that I chose to work on Hermione's Beaded Bag, (hopefully this link will work for you non-ravelrers) inspired by the 7th Harry Potter book, SO COOL!! It's turning out to be more time consuming than expected largely due to my idea of beading the beads to create a pattern instead of just stringing on one color of beads. WHY did I do this to myself?? On top of that, I get to test knit Kudzu Kuffs, which are Twilight inspired knitted wrist warmers, also on Ravelry, also SO COOL, which I will be making for my mom for Christmas. Should I be mentioning this?? Mom?? How often do you read my blog?? This pattern will be available for purchase next year. I've managed to finish my gauge swatch, so now I'm ready to cast on. Don't think I'll get these done in the next 6 days, so I'm going to give my mom the pattern, needles and skein of yarn with however much I have completed by Christmas. I wanted to get a package in the mail to Wisconsin...however the items for that package are incomplete as well...yet another top secret craft project. :) Last, but not least, I wanted to knit my husband a beanie hat. I have the pattern, which was a free download (Mr. Tom's Beanie, another by Woolly Wormhead, THANK YOU WW!!), I have the yarn and needles, I'm just running out of time. Again, another gift of the pattern and yarn skeins. However, I did manage to find this woodworking project for him and it arrived pretty promptly in the mail. I hope he digs it and is excited to build it for baby. I want to encourage his hobbies, I just hope he finds wood working a hobby. I hope you all have enjoyed this non-picture post, I'm hoping the number of links makes up for that. Since it may be a while before I get on again...

HAVE A MERRY CHRISTMAS AND A HAPPY NEW YEAR!!

Monday, November 2, 2009

Crafty Update

I have finally overcome my laziness of getting on the "slow" computer and downloading all my pictures from the past several months. I just dread getting on this computer because our new laptop is on and going in a snap! This first pic is a crocheted baby blanket that I made a friend who had her baby in July. I finished it the day she was born and delivered it the following day. I'm not that experienced, but I wonder if blocking it would have helped out the waves that occurred as it got larger? Not sure. I made up the pattern, it's a basic granny square with about six rows of double crochet in between the center and the outer edge. I used Lions Brand Homespun in their Tudor colorway. It took two full skeins and turned out SO SOFT!These Gabu's are all saying farewell to the pretty gray Gabu. She was made and sent as a PIF. The other four Gabu's were all made for office coworkers over the past year. There's my first Gabu, the Red Receptionist, Black Velvet Gabu with sparkly eyes, Camo Gabu with a line of black to look like his unibrow, then the green Gabu with a tuft of brown hair and a smile (he was for my son). Gabu was designed by Roxycraft and you can get the free pattern here. They are quick and easy to make, my son loves his!These owls were so fun to make! My sister-in-law came to visit and we decided to each make one, me, her and my toddler. Then I thought we could glue them to a cut branch from the backyard to cluster them all together. It turned out so cute!! We then sent them home with my mother-in-law. I got this idea from BabyCenter in an email they had sent me. You can get your instructions to make them here. It's a great craft to do with little ones since you first have to collect half the pieces. I used the hot glue gun instead of regular glue so that they would stay together faster.These were two of three Gnome Babies that I knitted to donate to our churches craft bazaar. They were another free pattern from a blog I found. You can check the pattern out here. The larger one sold and the other two were still there yesterday when we went to church. They are sitting on the four baby blankets that I sewed last week. I had the sewing machine out all week to get those baby blankets done for the church and my sons dragon costume completed.
This last picture is one I took for fun. I spilled a drop of milk on the counter when I was making my morning coffee. This is how it landed then splatted. I was so amazed I had to take a picture. You can see my feet on the floor wearing pink Smartwools, THE BEST sock your foot can ever wear. We used to get them at REI when my husband worked there, now we only get them for Christmas from family (they are not cheap!).
Well, that's what I've been up to in the crafty department for the past several months....well, really the past week mostly. The rest of it was before baby #2 was born. Enjoy!

Wednesday, October 21, 2009

No Sew Costumes...

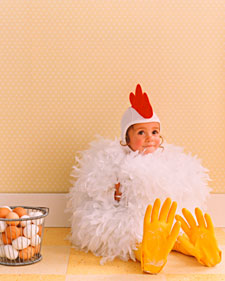
THIS is the CUTEST costume!! I'm not the biggest Martha Stewart fan, however, from another blog I follow, I learned about her no-sew costumes. The tutorial for it is here on Martha's website, it is so easy to make. I would LOVE to make this for my 3 year old, however we just bought our costumes yesterday and he wants to be a dragon (you can view it here at the Target website). I know, I know, I should be sewing his costume like I did for the past two years. Last years Halloween costume is shown here in last years blog and the year prior to that he was an Oompa Loompa from the original Willy Wonka movie. I made both of these costumes. The Oompa Loompa costume was so cute, I even made two others for our friends kids we went trick-or-treating with, so there were three little Oompa Loompas together. This year, time is not really on my side. But I do have to make the hooded head and dragon legs, it's only a partial costume, it was missing pieces so we got it for a great price. I'll have more pictures after the event, until then, I do need to get sewing on the dragon head.